If you are new to programming or trying to understand data structures, NX-API CLI is the perfect starting point. NX-API CLI allows you to take CLI commands that you already know today and wrap them in a RESTful API framework. This part of the lab is going to make use of a show command and configuration command within the NX-API Sandbox to understand the data structure for making the request and what you should expect in the response data structure of an NX-API CLI Request interface, predominantly focusing on the JSON interface.
The NX-API CLI that uses the XML or JSON interfaces format can make use of both XML and JSON data structures respectively. The request and response elements are tabulated below:
| Request Element | Description |
|---|---|
| version | Specifies the NX-API version |
| sid | Only valid when response message is chunked. In order to retrieve the next chunk of message, the user is expected to send a NX-API request with sid set to the sid in the previous response message. |
| type |
Specifies the type of command:
|
| chunk | Specifies whether to start displaying show command output before the entire command completes |
| input |
Input of one or more commands Show and configure commands should be kept separate due to different message types |
| output_format | The content-type in the HTTP/HTTPS header determines the type of response, XML or JSON |
| rollback |
Specifies the rollback options. Only valid for configuration commands, not show commands.
|
| Response Element | Description |
|---|---|
| version | Specifies the NX-API version |
| type |
Specifies the type of command:
|
| sid | Session ID of current response. Only valid for chunked output |
| outputs | Tag enclosing all the commands' outputs |
| output | Tag enclosing output of a single command output. In the cli_conf and bash cases, it contains outputs of all the commands |
| body | The body of the response to the command |
| code | The error code of the command execution. Standard HTTP error codes are used here |
| msg | The error message associated with the error code, providing more details of the command execution status |
XML stands for eXtensible Markup Language and is a markup language much like HTML. It is considered to be simple and flexible text format that was designed to carry data. In the example below you can see XML syntax where information is wrapped in pre-defined tags correlating back to the NX-API request elements.
Example NX-API CLI XML Interface Data Structure:
<?xml version="1.0"?>
<ins_api>
  <version>1.0</version>
  <type>cli_show</type>
  <chunk>0</chunk>
  <sid>sid</sid>
  <input>router ospf UNDERLAY</input>
  <output_format>xml</output_format>
</ins_api>
JSON stands for JavaScript Object Notation and is an independent text format that is considered to be the ideal data-interchange language due to how it can map directly to various programming languages, including Python. JSON correlates to these programming languages as two different types of data structures. The first data structure type would be as a collection of key/value pairs, where in Python, this would correspond to a dictionary object. You will be leveraging this relationship throughout this lab. The second data structure type would be an ordered list of values, corresponding to something such as an array or list. In the example below, JSON syntax uses pre-defined keys to reference information values correlating back to the NX-API request elements.
Example NX-API CLI JSON Interface Data Structure:
{
  "ins_api": {
    "version": "1.0",
    "type": "cli_show",
    "chunk": "0",
    "sid": "sid",
    "input": "router ospf UNDERLAY",
    "output_format": "json"
  }
}
In the NX-API Sandbox web application perform the following steps:
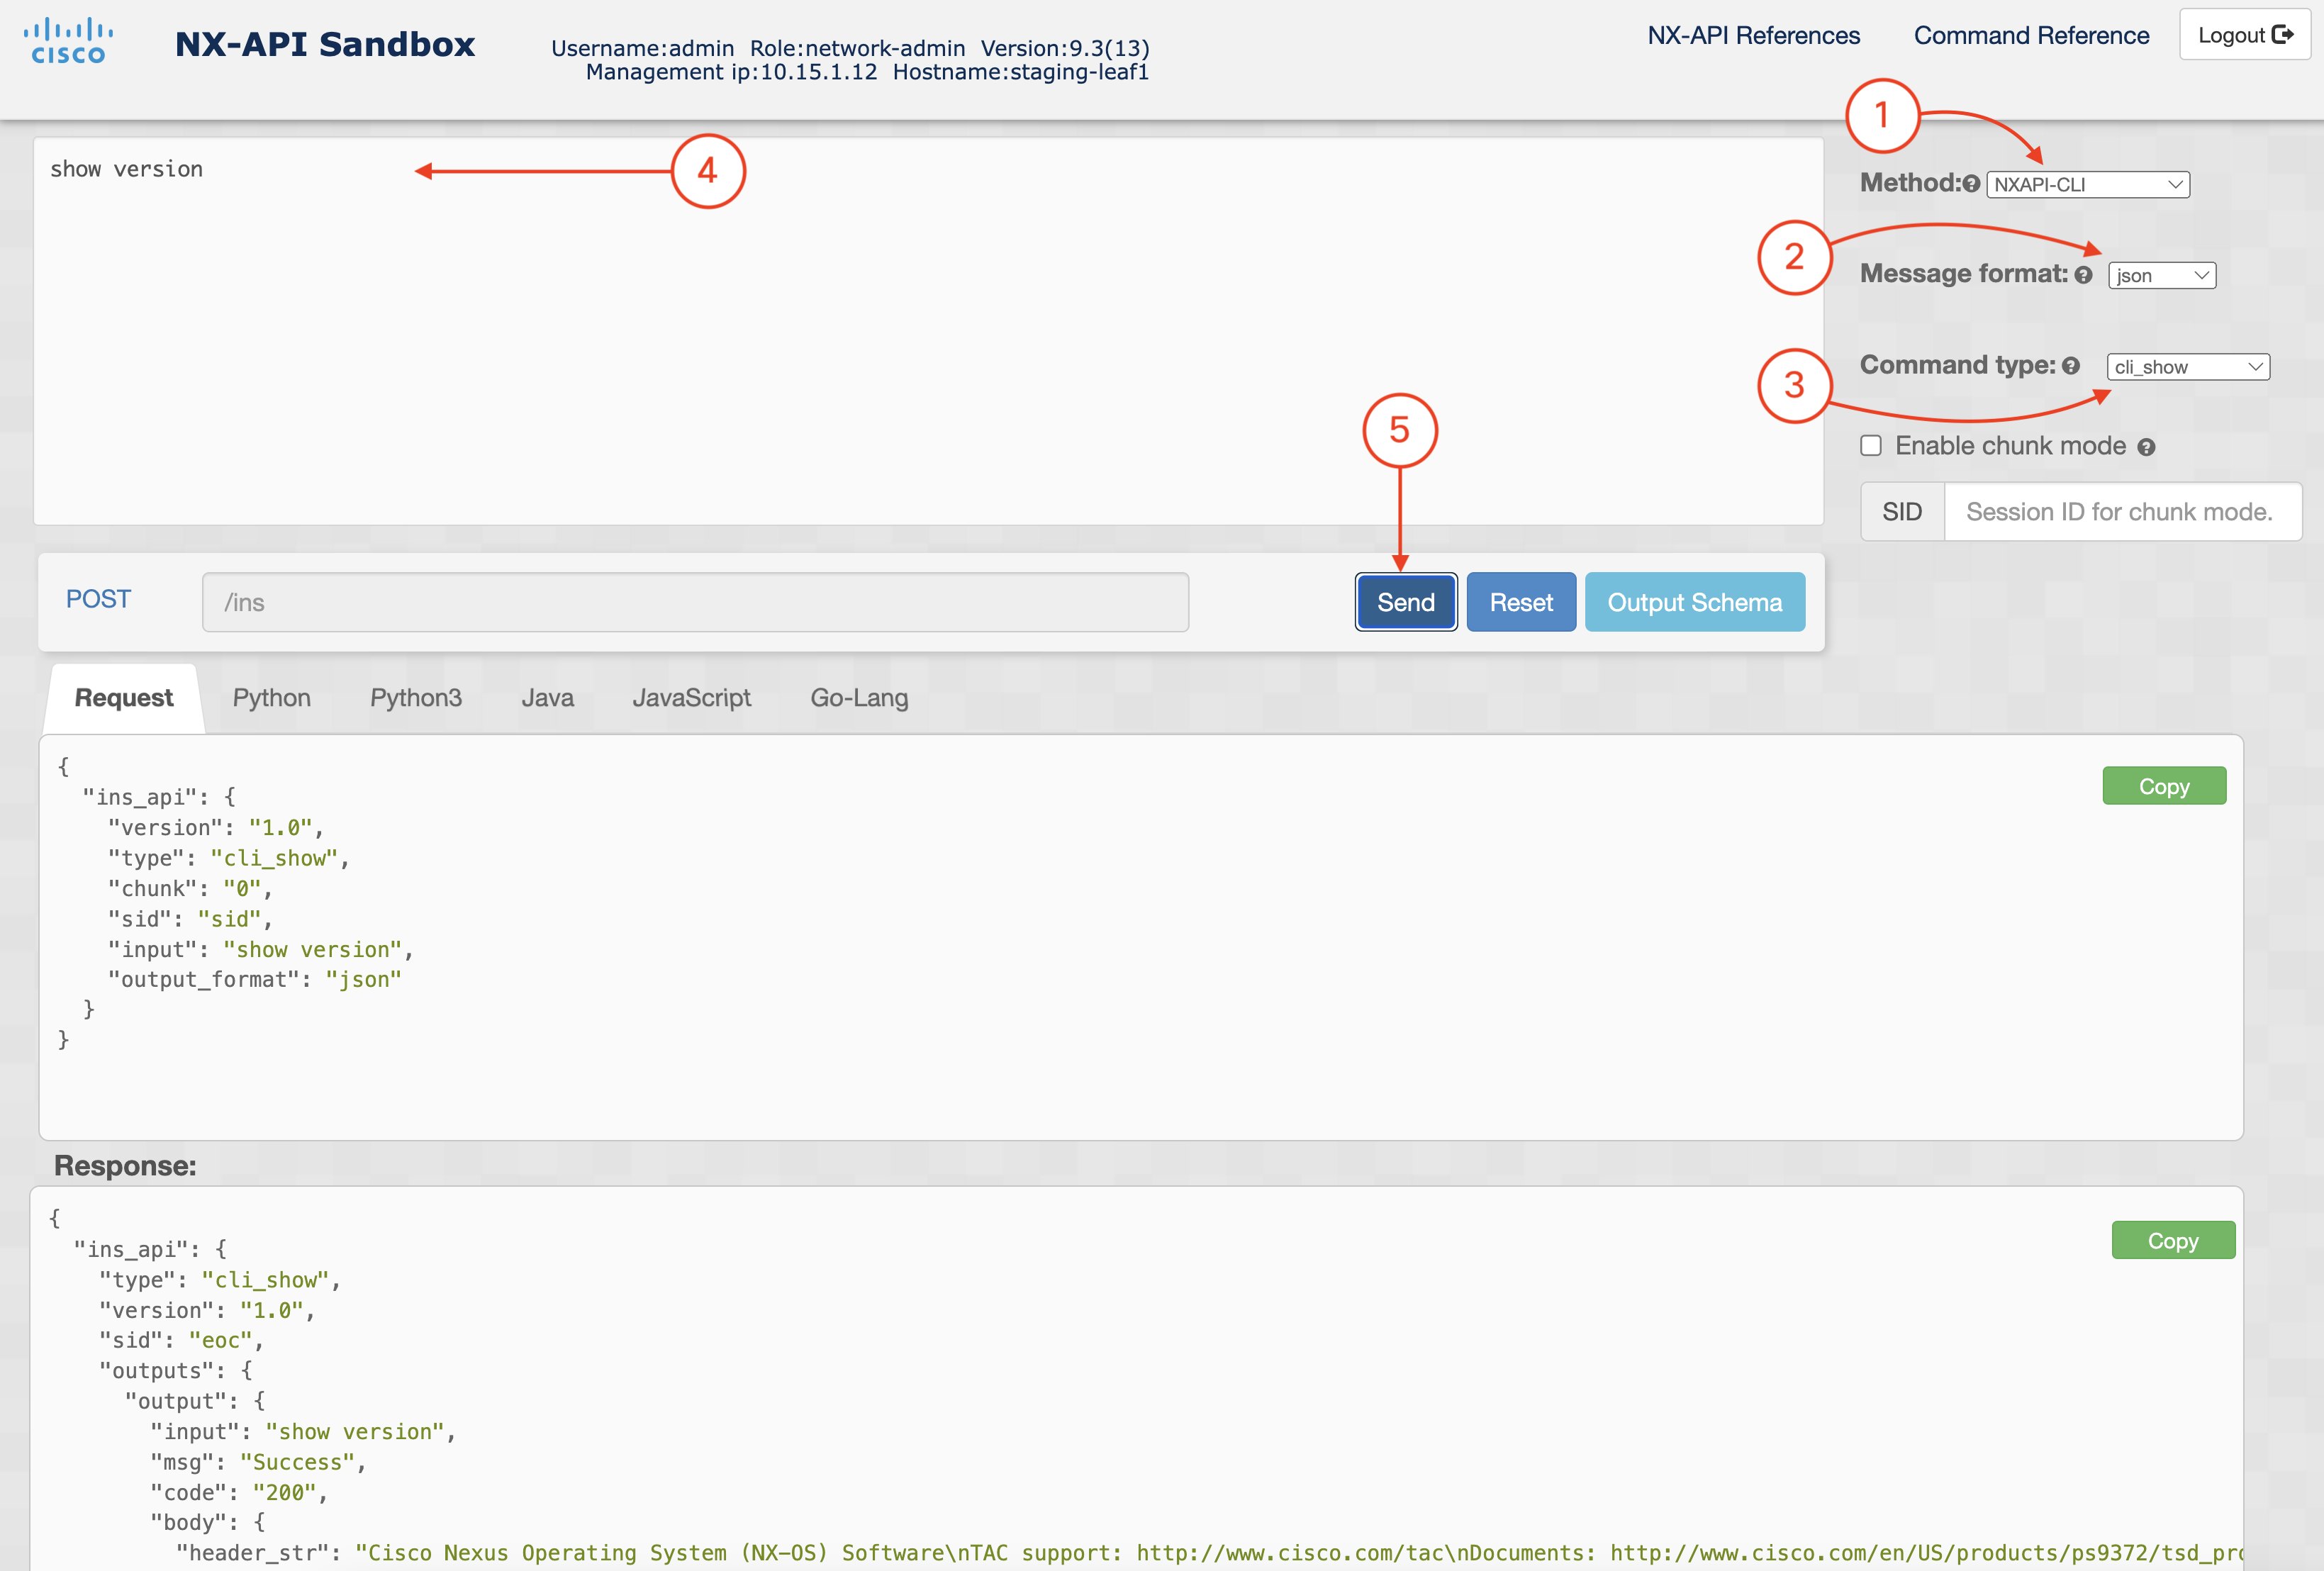
Locate the two panes: Request: and Response: Within each, you will notice the request and response elements and values. The response in particular provides you a data structure of key/pair values that can be easily parsed.
Request:
{
  "ins_api": {
    "version": "1.0",
    "type": "cli_show",
    "chunk": "0",
    "sid": "sid",
    "input": "show version",
    "output_format": "json"
  }
}
Response:
{
  "ins_api": {
    "type": "cli_show",
    "version": "1.0",
    "sid": "eoc",
    "outputs": {
      "output": {
        "input": "show version",
        "msg": "Success",
        "code": "200",
        "body": {
          "header_str": "Cisco Nexus Operating System (NX-OS) Software\nTAC support: http://www.cisco.com/tac\nDocuments: http://www.cisco.com/en/US/products/ps9372/tsd_products_support_series_home.html\nCopyright (c) 2002-2024, Cisco Systems, Inc. All rights reserved.\nThe copyrights to certain works contained herein are owned by\nother third parties and are used and distributed under license.\nSome parts of this software are covered under the GNU Public\nLicense. A copy of the license is available at\nhttp://www.gnu.org/licenses/gpl.html.\n\nNexus 9000v is a demo version of the Nexus Operating System\n",
          "bios_ver_str": "",
          "kickstart_ver_str": "10.5(2)",
          "release_type": "Feature Release",
          "nxos_ver_str": "10.5(2)",
          "bios_cmpl_time": "",
          "kick_file_name": "bootflash:///nxos64-cs-lite.10.5.2.F.bin",
          "nxos_file_name": "bootflash:///nxos64-cs-lite.10.5.2.F.bin",
          "kick_cmpl_time": "11/30/2024 12:00:00",
          "nxos_cmpl_time": "11/30/2024 12:00:00",
          "kick_tmstmp": "11/26/2024 10:34:40",
          "nxos_tmstmp": "11/26/2024 10:34:40",
          "chassis_id": "cisco Nexus9000 C9300v Chassis",
          "cpu_name": "Intel(R) Xeon(R) CPU E5-2680 v3 @ 2.50GHz",
          "memory": 8145828,
          "mem_type": "kB",
          "proc_board_id": "9EP3POD8HOP",
          "host_name": "staging-leaf1",
          "bootflash_size": 8598528,
          "kern_uptm_days": 0,
          "kern_uptm_hrs": 10,
          "kern_uptm_mins": 37,
          "kern_uptm_secs": 50,
          "rr_reason": "Unknown",
          "rr_sys_ver": "",
          "rr_service": "",
          "plugins": "Core Plugin, Ethernet Plugin",
          "manufacturer": "Cisco Systems, Inc.",
          "TABLE_package_list": {
            "ROW_package_list": {
              "package_id": ""
            }
          }
        }
      }
    }
  }
}
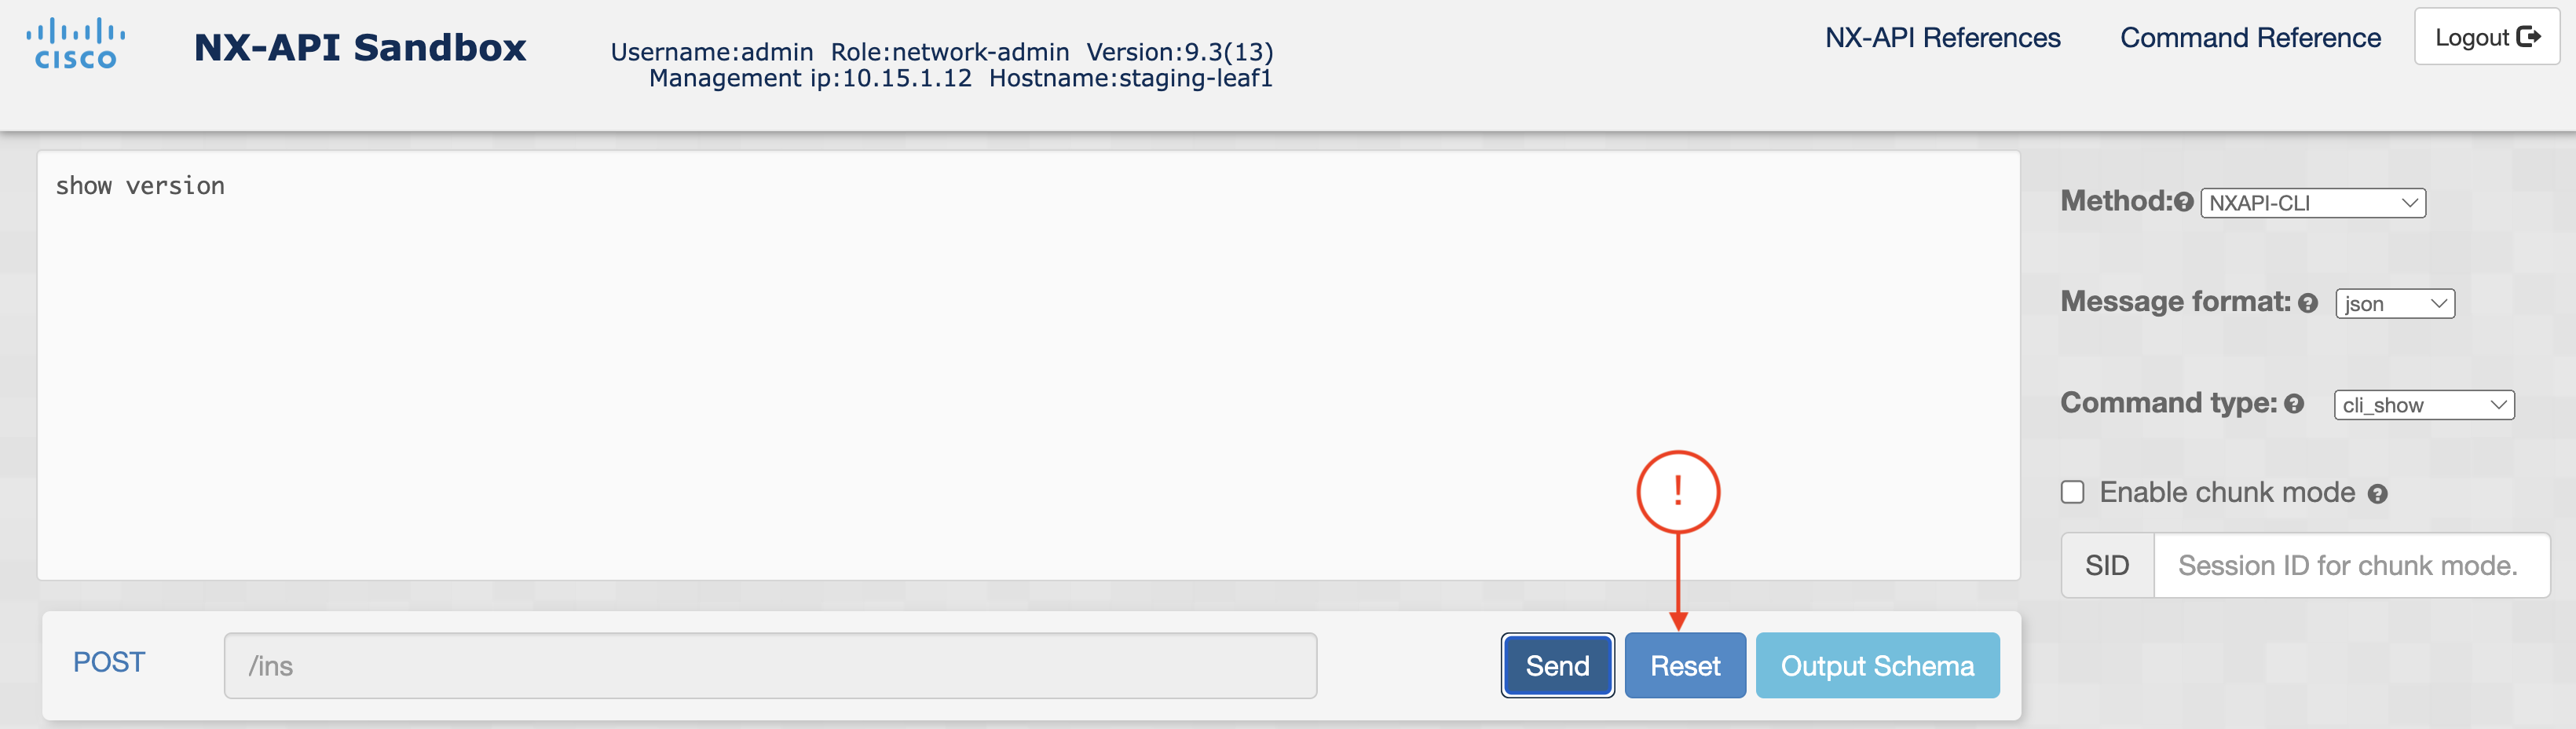
In the NX-API Sandbox, click the Reset button.
In the NX-API Sandbox web application perform the following steps:
This is a new feature introduced in NXOS 9.x. This feature provides three options in the event a configuration error occurs from sending configuration commands via the API. The Error Actions that are available are Stop-on-error, Continue-on-error, and Rollback-on-error.
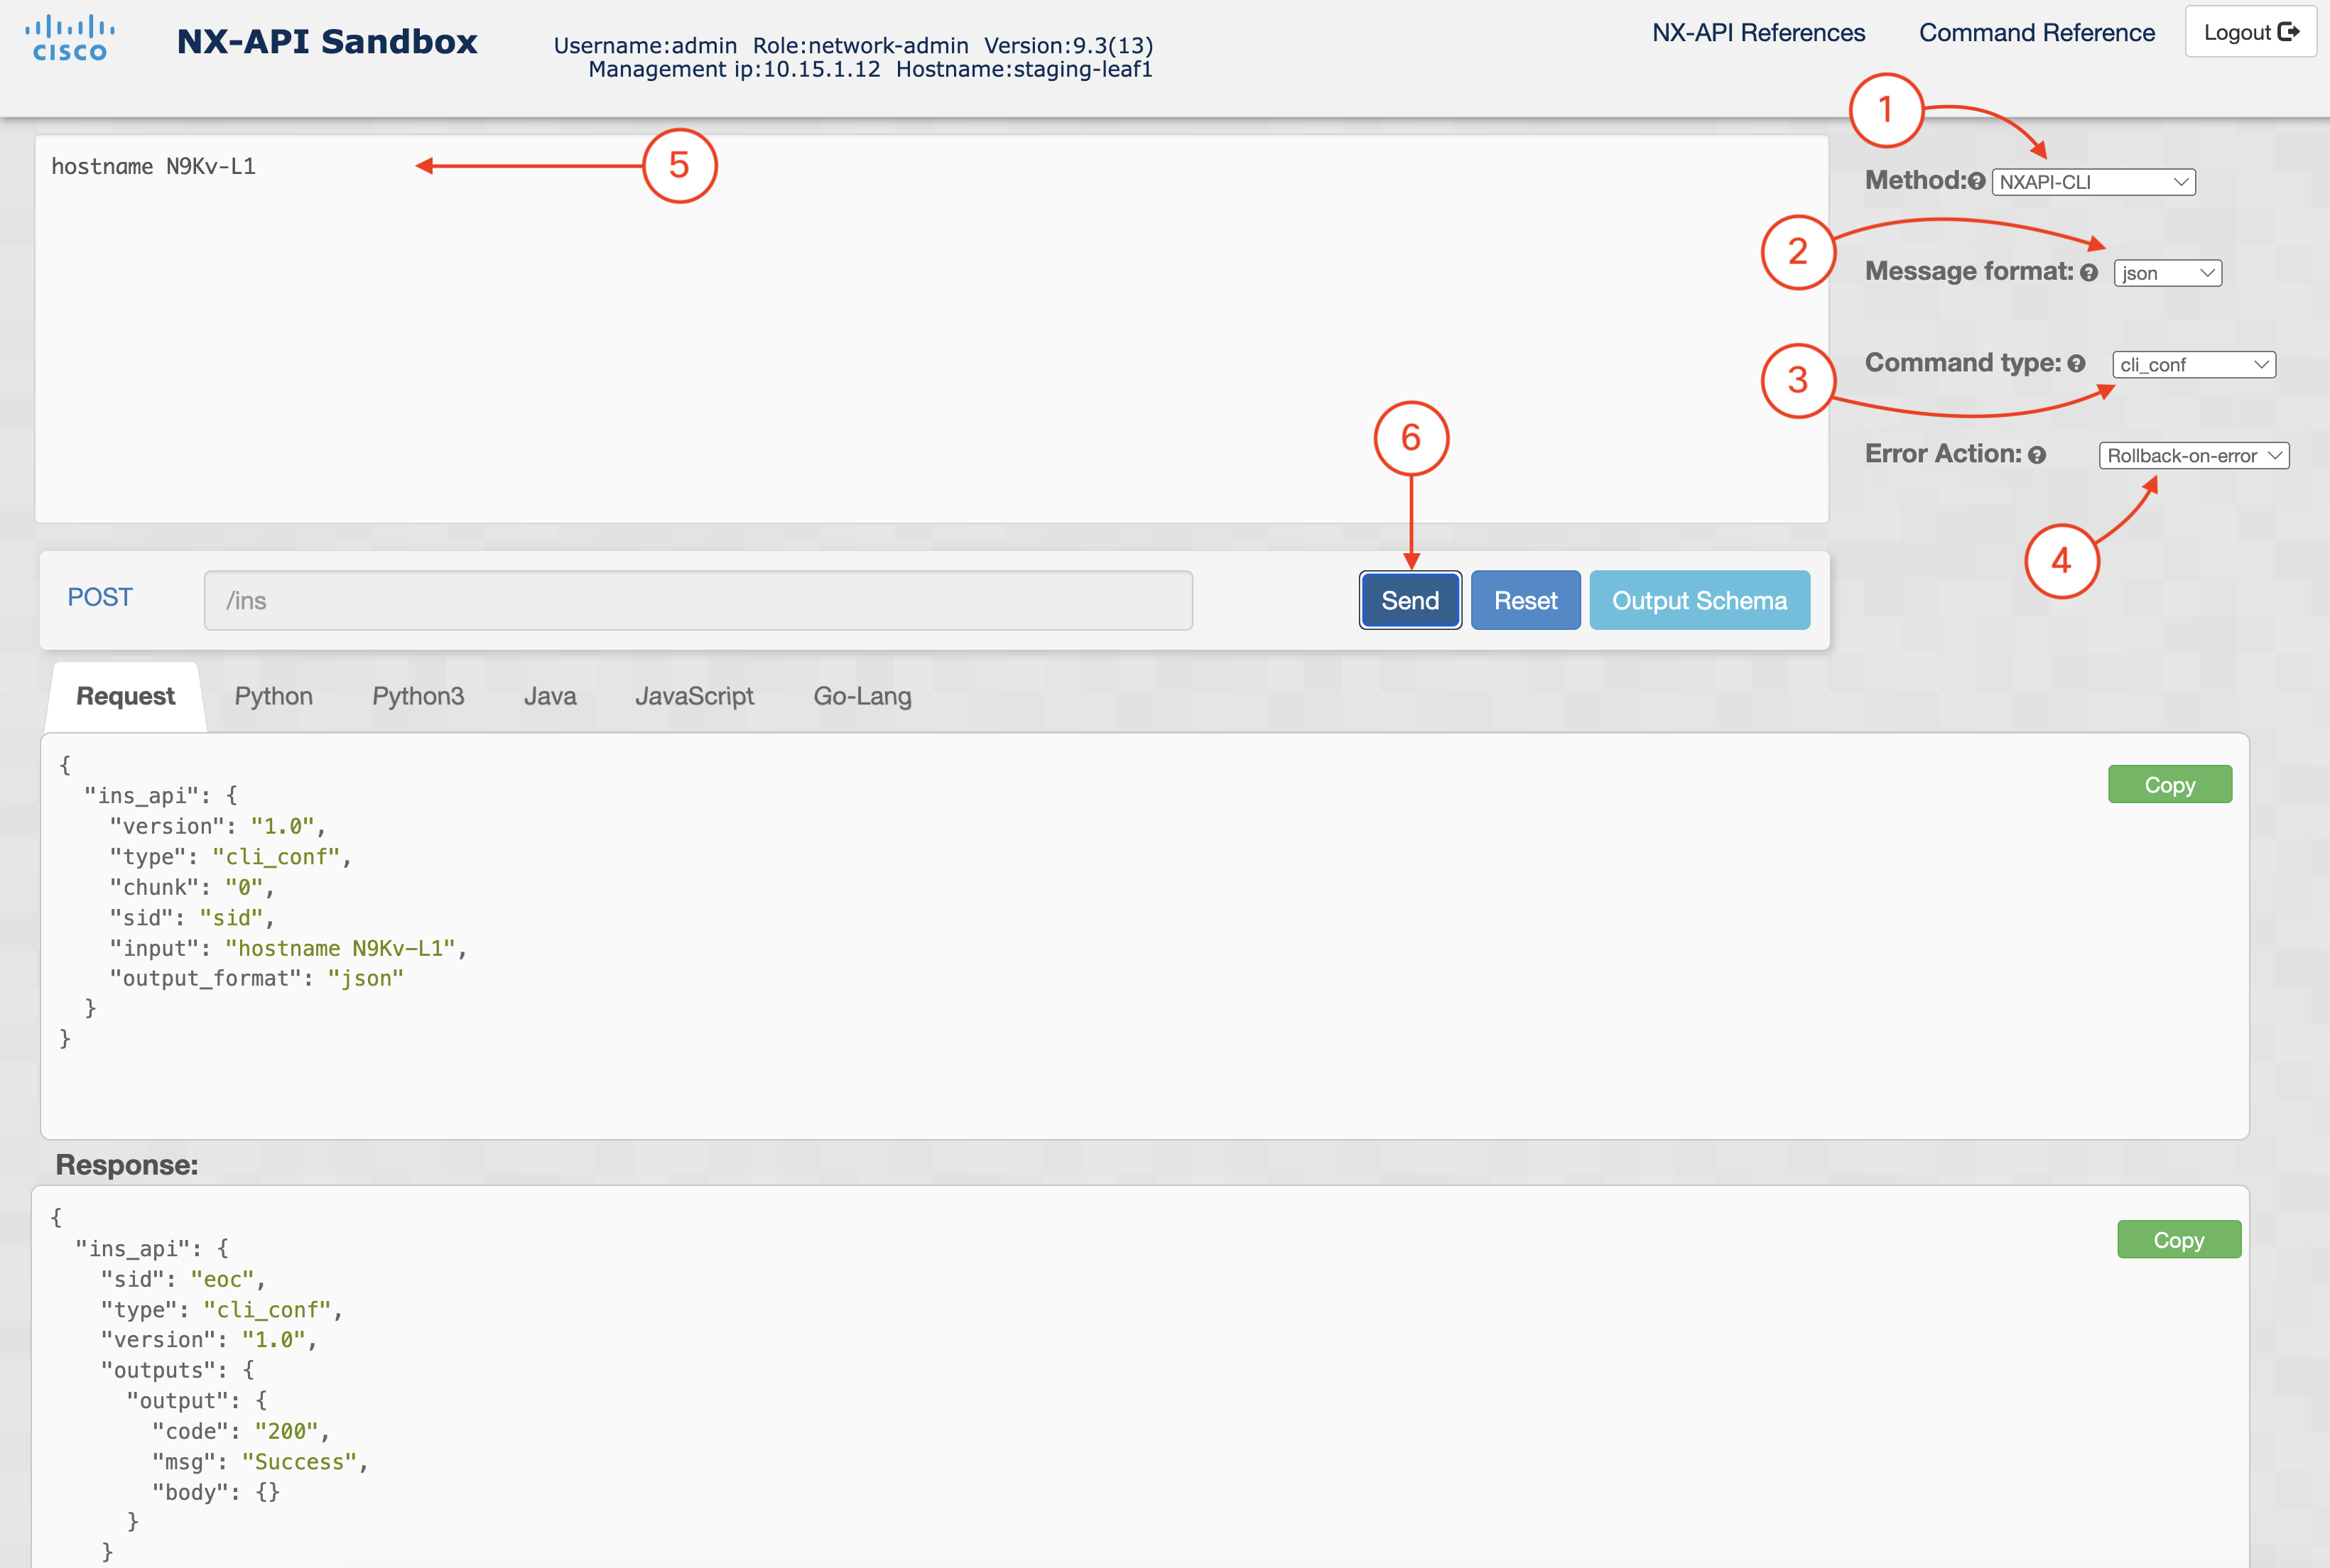
Once again, locate the two panes: Request: and Response: Within each, you will notice the request and response elements and values. This time, the response provides you a data structure of key/pair values that confirm if the POST request to the device was successful.
Request:
{
  "ins_api": {
    "version": "1.0",
    "type": "cli_conf",
    "chunk": "0",
    "sid": "sid",
    "input": "hostname N9Kv-L1",
    "output_format": "json",
    "rollback": "rollback-on-error"
  }
}
Response:
{
  "ins_api": {
    "version": "1.0",
    "sid": "eoc",
    "type": "cli_conf",
    "outputs": {
      "output": {
        "code": "200",
        "msg": "Success",
        "body": {}
      }
    }
  }
}
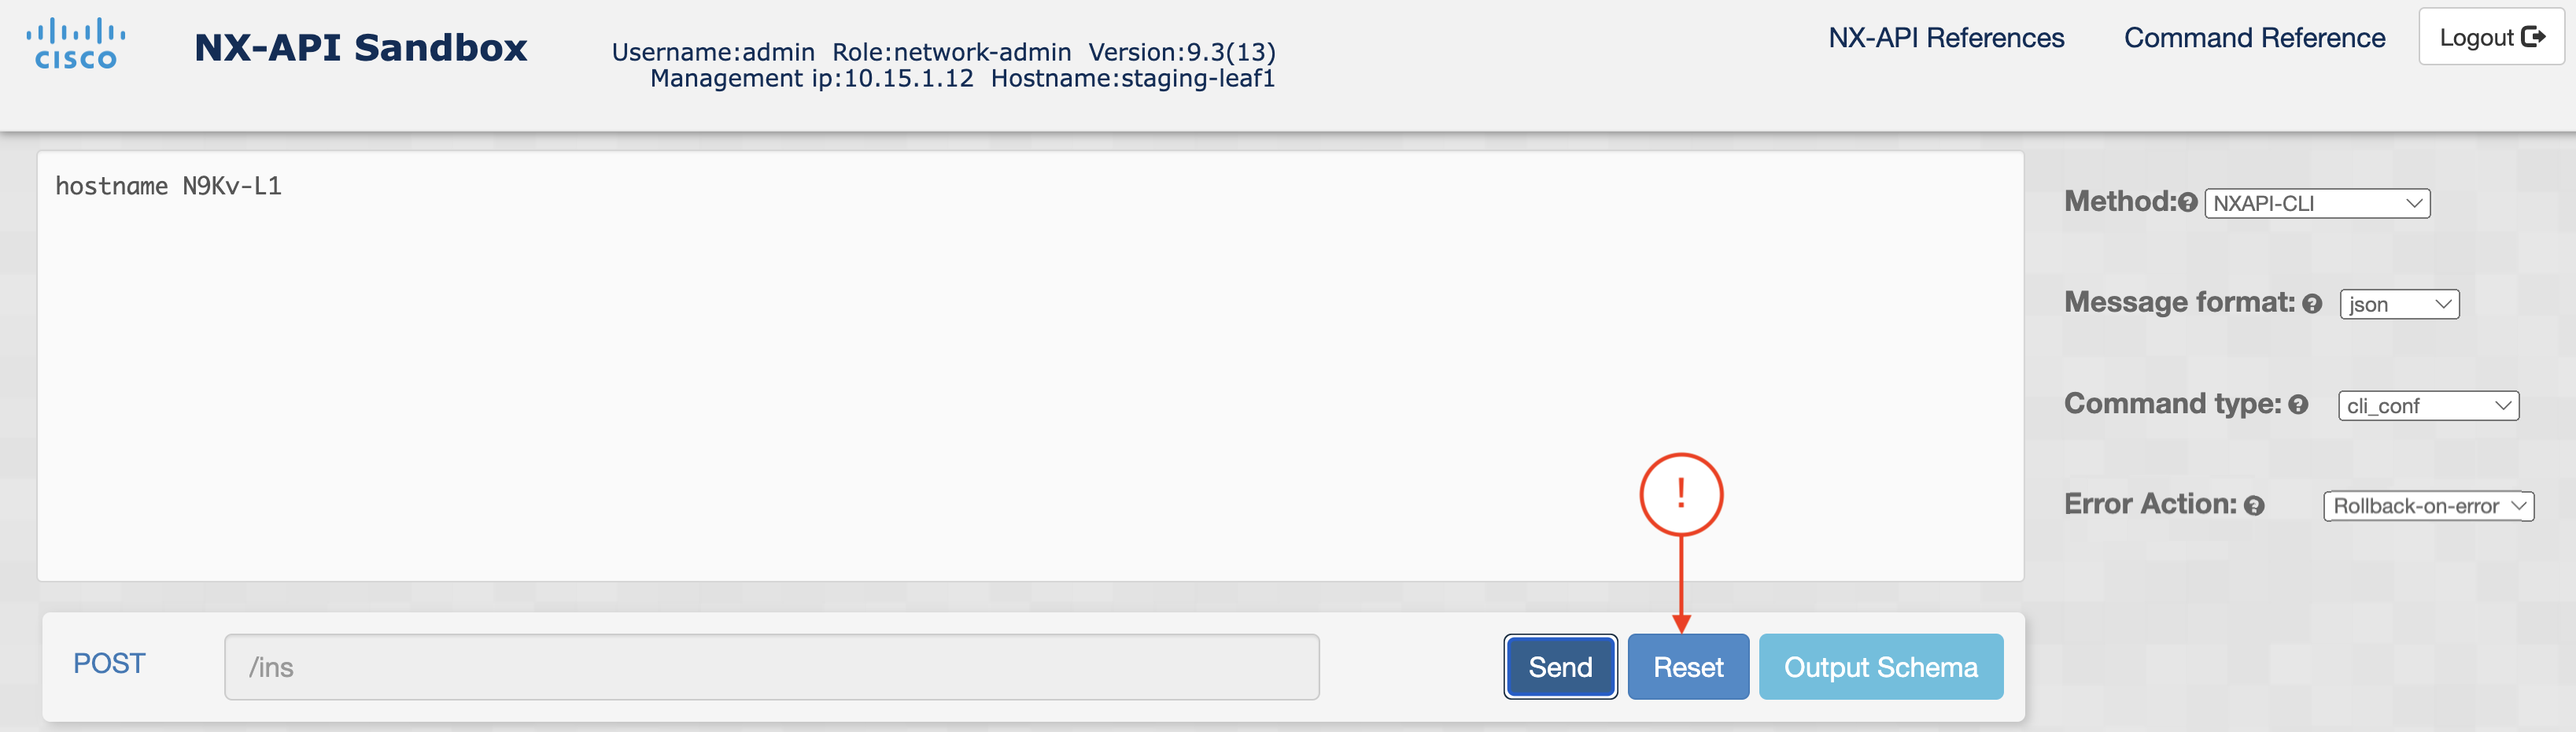
In the NX-API Sandbox, click the Reset button.
Continue to the next section to explore the NX-API CLI JSON-RPC API.